Note that these instructions assume that you
are using Windows XP in its default state instead of its
secondary option of looking like Windows 2000. Also, there
seems to be very slight variations of the Connection Wizard
between Windows XP Home and Windows XP Professional; the
screenshots below were done with Windows XP Professional but
the Home versions should look very similar and should not
hinder their ability to help you set your computer up to
Pacific Online.
Introduction
Go to your Start menu, then go to Control Panel. In
Control Panel click on "Network and Internet
Connections". Now scroll down to the
bottom of the page and click on "Network
Connections". On the panel that comes up click (or
double-click depending on what opens the program) on
"Create a new connection".
|
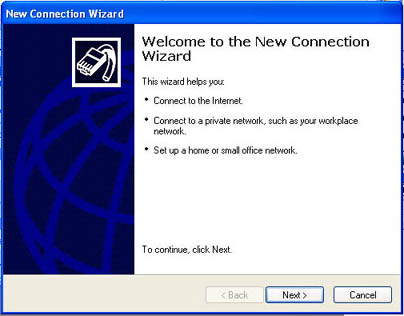
Step 1
This is just an introduction-type screen describing what you
will be doing and what you can do with the Connection
Wizard.
Click the next button when you are ready to continue.
|
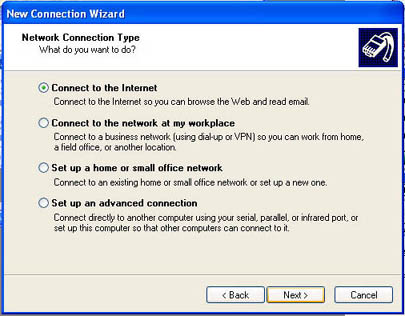
Step 2
Click the dot next to "Connect to the Internet".
You could potentially setup any type of connection supported
by Windows XP right from this screen, but for your Pacific
Online dialup we will be using a simple Dialup Connection
configuration.
Click the next button when you are ready to continue.
|
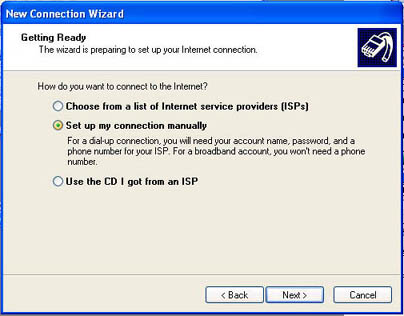
Step 3
Click the dot next to "Set up my connection
manually" since Pacific Online requires certain
settings to be enabled and disabled to properly connect to
our servers. If you have the Pacific Online (NetSurfer) CD you should cancel this Connection
Wizard and run through the install of our CD.
Please be aware that if you do have a Pacific Online CD that
Versions 2 and beyond will only work with Windows XP;
Version 1 will not work at all (it will not be able to find
Dialup Networking). Our CD's are labeled clearly on the front side of the CD,
labeled something to the effect of "CD Version
2.1" or similar to that..
Click the next button when you are ready to continue.
|
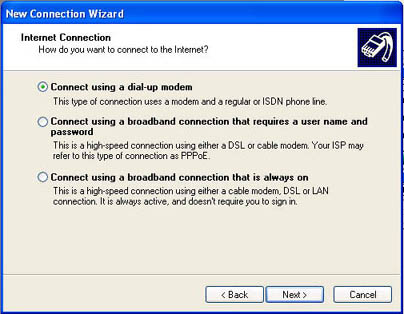
Step 4
Click the dot next to "Connect using a dial-up
modem" since you are of course dialing up to Pacific
Online via your computers modem. Technically if you had
another type of service like Dialup DSL or Static DSL you
could set that connection up with this same Connection
Wizard but for these instructions we will be setting up your
Pacific Online dialup connection.
Click the next button when you are ready to continue.
|
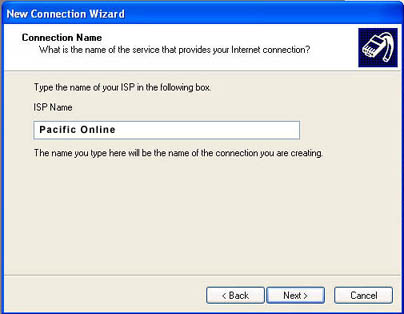
Step 5
Erase the contents of the "ISP Name" box (if there
is anything in the box), then enter in the box (exactly as
is typed in the above picture and in this text) "Pacific Online"
(no quotes).
Technically you can enter anything you would like to enter
in this box, but we recommend that you put in Pacific Online
as this will make both tech support with us easier as well
as letting you know what connections are setup on your
computer. If you wish to use another name for whatever reason
that is perfectly fine but we do recommend using something that you are going
to remember is associated with Pacific Online (pon.net, PON
dialup, PON, etc).
Click the next button when you are ready to continue.
|
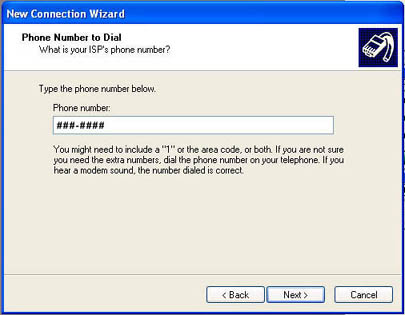
Step 6
Erase the contents of the "Phone number"
box (if there is anything in the box), then enter in the
dialup number for your area. The list of those dialup
numbers can be found here.
As always, if you cannot find a number that coincides with
the city you are in or do not recognize the number as being
one for that city, or even if you simply have any doubts as
to the locality of any of our dialup numbers, please check
with your telephone operator or your phone book as we cannot
assume responsibility for long distance charges incurred by
using our dialup numbers nor can we guarantee any dialup
number to be local for your area.
This is also the area you will need to enter in any special
characters or character sets to disable such phone options
as Call Waiting, Call Forwarding, Message Boxes, etc. You
may need to contact your phone company for directions on
what you will need to enter into this box to disable such
phone functions.
Last but not least, and most importantly, do not
enter an area code at any point while you are putting in
your dialup number as this will most likely (90% of the
time) cause your computer to dial the number long distance.
Only put an area code in the phone number if you are absolutely
sure that you need to dial an area code for the area you are
in. If you are in any doubt contact your phone company or
check your phone book to see if you do need to dial an area
code. Chances are that if you do not have to dial an area
code for regular voice calls then you probably will not have
to have your computer dial an area code when it dials up to
our service.
Click the next button when you are ready to continue.
|
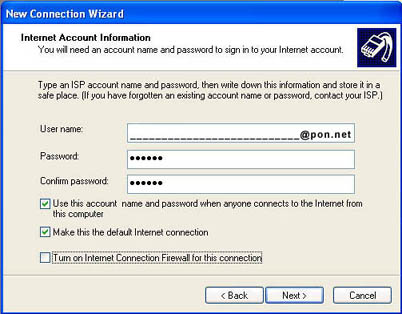
Step 7
Erase the contents of all three of these boxes (if there is
any information located in them when you get to this box).
In the "User name" box, type in your Pacific
Online dialup username all lower-case with no spaces; if you
are unsure what this may be, this is your entire email
address (if you have an @pon.net email).
If you have a domain name you will need to put in this box domain@pon.net
where the domain section is your website address
without the www. and the dot-extension. For example if your
website was www.my-website.com then you would put in
the username box my-website@pon.net all lower-case
and without spaces.
As for the three check boxes below, those are probably best
left checked.
If you turn the first checkbox off and are using multiple
logins on that machine any user other then on the user the
connection was made will need to enter in the login
information when they connect (thus keeping unwanted access
to your dialup to a minimum).
If you turn the second checkbox off Windows will assume that
you want to use whatever previously setup connection for the
default connection making that connection the first dialup
Windows tries when you get online.
If you turn the third checkbox on (should be off by default)
Windows will use its internal Firewall software to keep
unwanted packets of information and such from getting into
your computer. However we do not support setup or
troubleshooting of this function of Windows XP so if you do
set this up we will nt be able to help you correctly setup
or maintain this function of windows. This can also prevent
certain online services to not function correctly with your
connection as well so we recommend you not turn this on
unless you know that you are able to correctly use this
function.
Click the next button when you are ready to continue.
|
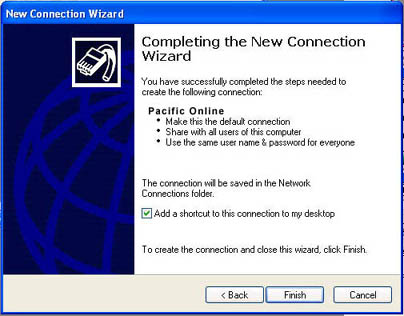
Step 8
You are now finished with the setup of Pacific
Online through Windows XP's Connection Wizard. We recommend
you check the "Add a shortcut to this connection to my
desktop" checkbox on to make an easy-to-access icon for
Pacific Online right on your desktop.
Click the Finish button when you are ready to save the
settings for your Pacific Online setup.
|